How to Create Stunning Duotone Effects in Illustrator: A Step-by-Step Guide

Daniel Scott
@dan
In this post we are all about duotones! I’ll walk you through what these are, why designers love them, and how to create stunning duotones effects in Illustrator and transform your photos into impactful artworks! There will be some skill stacking along the way, this is Advanced Illustrator, after all. We’ll remember features like Image Trace, Blending Modes, Halftones, and combine them to create an awesome poster inspired by a beautiful cathedral I’ve visited not so long ago. It’s going to be exciting!
This post is based on my recently updated Illustrator Advanced course, make sure to sign up at Bring Your Own Laptop! When you become a BYOL member, you gain access to this course as well as my 30+ additional courses on Photoshop, Lightroom, InDesign, Figma, and more. As a BYOL member you will also enjoy personalized support, earn certificates, and tackle exciting community challenges. Head here to sign-up!
Set your color palettes to duo mode, and let’s get busy!
What are Duotone Images?
Duotones are made by combining two overlapping colors, usually black combined with some other color, for contrast, depth, and texture enhancement.
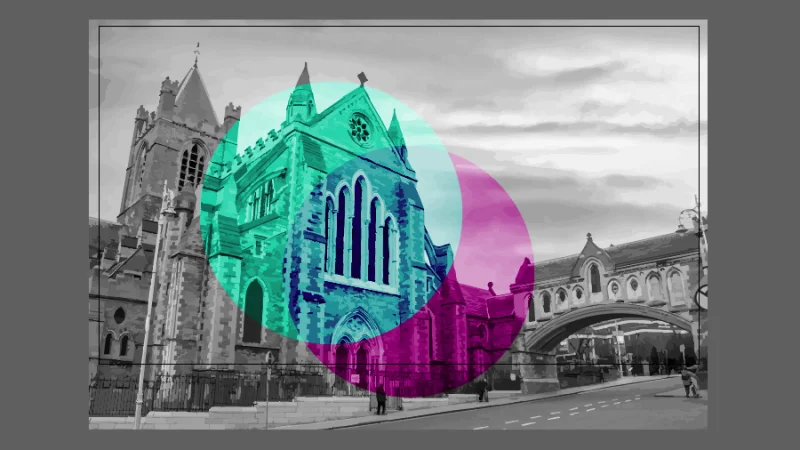
The duotone effect is visible inside the circles’ overlapping spaces. Cool, huh?
Even though duotones have been used in photography and the printing industry since the late 19th century, graphic design brought them back as a trending style in the 1980’s on magazines, posters, and music album covers like Queen’s “Hot Space’, Talkinghead’s “Remain in Light”, or The Police’s “Synchronicity.” In the early 21st century, duotones began trending once again, as a powerful source for modern and compelling imagery through the use of limited color palettes.
Branding projects and marketing develop duotone logos, ads, posters, banners, packaging, and social posts, ensuring both cohesive visual identities and intense, eye-catching styles.
Editorial designs like magazines, newspapers, and digital media use duotone visuals to add new layers of depth and impact to their messages, content, and storytelling.
Music and Arts often turn to duotones for album covers, posters, and even video publishing to highlight emotions and create powerful visual elements.
Duotones are pretty much everywhere and in this tutorial I am going to show you exactly how to create this awesome effect in Illustrator!
How to Create Duotone Images in Illustrator
We will be working with these three elements in Illustrator: text, photo, and artboard. All of these are exclusively available for BYOL students, so pick them up from the Course’s Exercise Files or use your own text and images, that’s also fine! The really important part is that you follow along and fully grasp all of the steps.
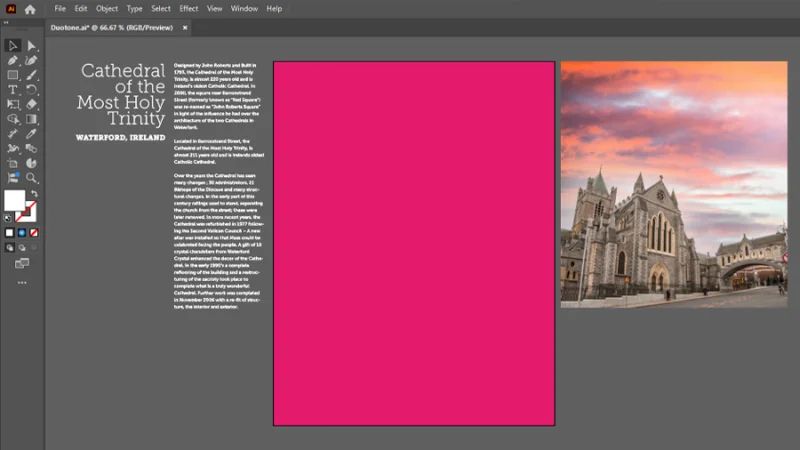
This is our ‘Before’ reference. The ‘After’ will blow your mind!
Let’s bring in the photo. I’ll move a step back and show you how to Place an image inside the artboard. No big deal, you go to File on the top menu bar and select Place or strike the shortcut keys (you know I love them): Shift + Command + P on a Mac or Shift + Control + P on a PC. Pick your image from the browse window, hit Enter or click the Place button to confirm, and then click, hold, and drag the image to fit your artboard’s width.
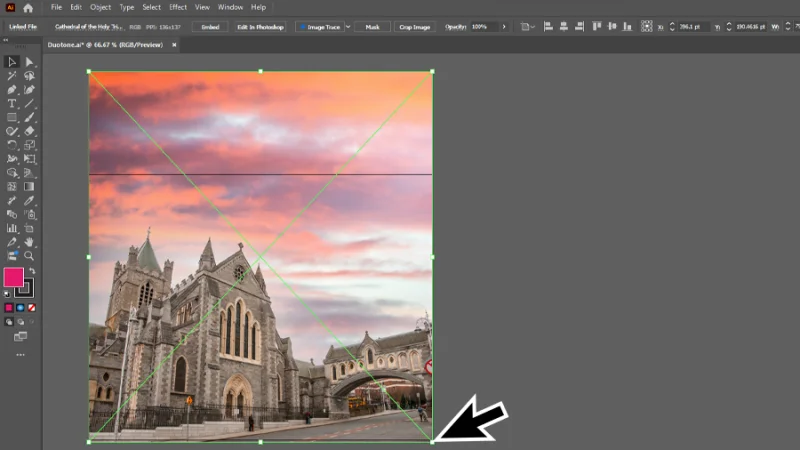
As an alternative, single-click the mouse button to place the image in its original size.
This photo looks really great, but for this project, we need to remove the sky to create a clean background for the text paragraphs we’ll bring in a few steps later.
Removing the sky is something that Illustrator isn’t exactly top-notch at, so the quick and easiest way to do this it to open the image in Photoshop for editing. Seamless integration like this is one of Adobe Creative Cloud’s top benefits, for sure! With the photo selected, remember this is a raster image, or pixel-based, click the Edit in Photoshop button over at the Properties panel, under Quick Actions.
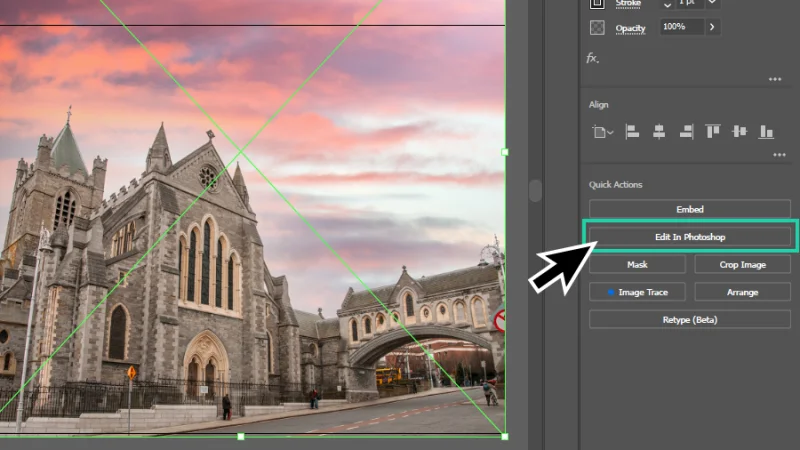
Quickly edit a photo in Photoshop and take full advantage of both apps in the same project.
Inside Photoshop, click Select on the top menu bar and then Sky. Wait a couple of seconds and you will see the dashed selected area line limiting the sky portion of the image. We want to mask the image and make the sky disappear. If we add a mask right now, Photoshop will hide the elements in the foreground and keep the cloudy background visible. We need to invert the selection. There are two ways to do it:
Click Select on the top menu bar and then Inverse.
Hit the shortcut keys Shift + Command + I on a Mac or Shift + Control + I on a PC.
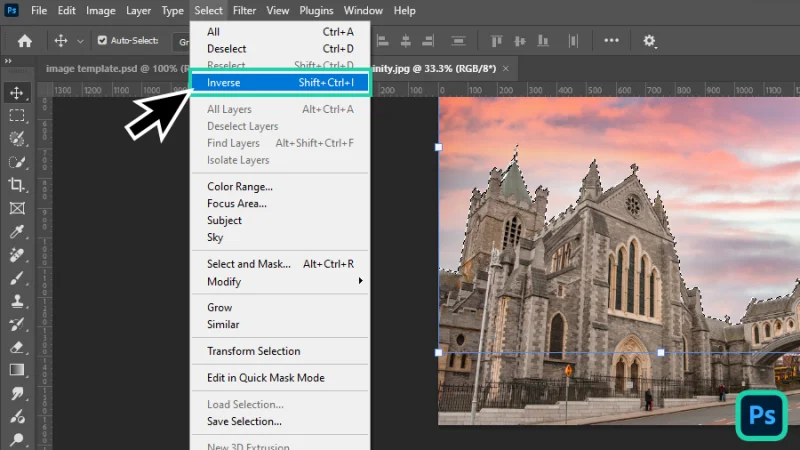
We need to flip – or inverse - the selection area to mask the sky.
You’ll see that the selected area now surrounds the photo’s foreground, that’s the cathedral and that bit of street with people walking by. Next, we click the Layer Mask button, at the bottom of the Layers panel.
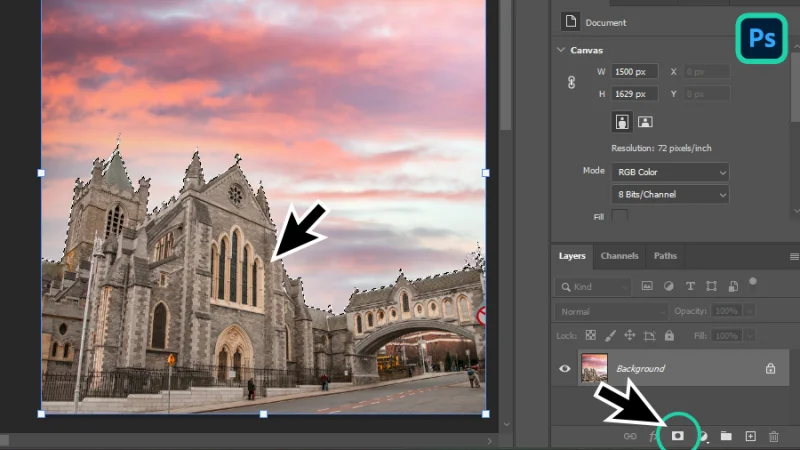
Click the Layer Mask button to add a mask to the photo and hide the sky behind it.
We now have a transparent background behind our cathedral photo. Let’s save the image. You can save it as a PNG to keep the transparency (JPEG does not support transparent layers) or as a Photoshop Document (PSD), just in case we need to come back and edit it a bit more.
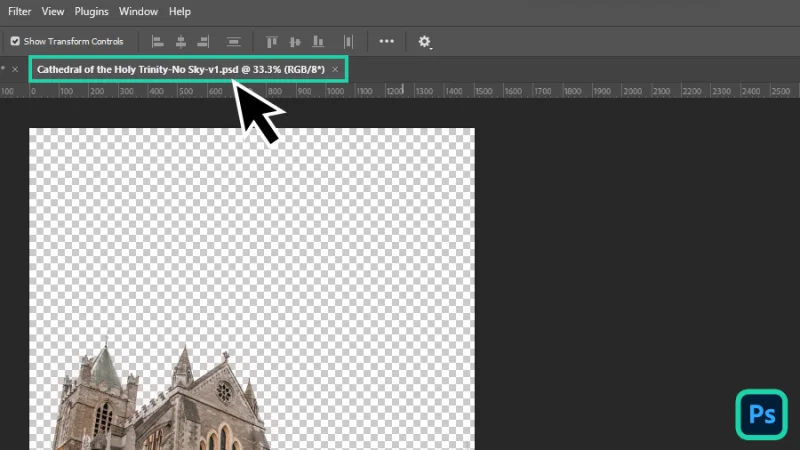
It’s ok to save as PDF because it is perfectly compatible with Illustrator. Cool!
Pro Tip: If we edit an image, let’s say a common JPG file, and save it without changing the name or format, it will update as soon as you jump back into Illustrator. That’s how impressive integration is in Adobe Creative Cloud. If you are new to Photoshop and want to learn more about image editing and witness how integration between Adobe apps can change your life, head over to my Photoshop Essentials and Advanced courses at Bring Your Own Laptop!
Moving on!
We are back in Illustrator and we want to update our cathedral image. Once again, there are two ways to accomplish this, entry-level (delete and place the new PSD version) or awesome professional! I know you are aiming for an awesome professional seat, so here goes:
Click on the Relink icon in your Contextual Task Bar. If you can’t find it floating around your workspace, go to Window on the top menu bar and click on Contextual Task Bar. You can also open the Links panel by going to Window and clicking on Links.
Inside the Links panel, click on the menu button on the top left (the User Interface all-time favorite hamburger icon), and then choose Relink.
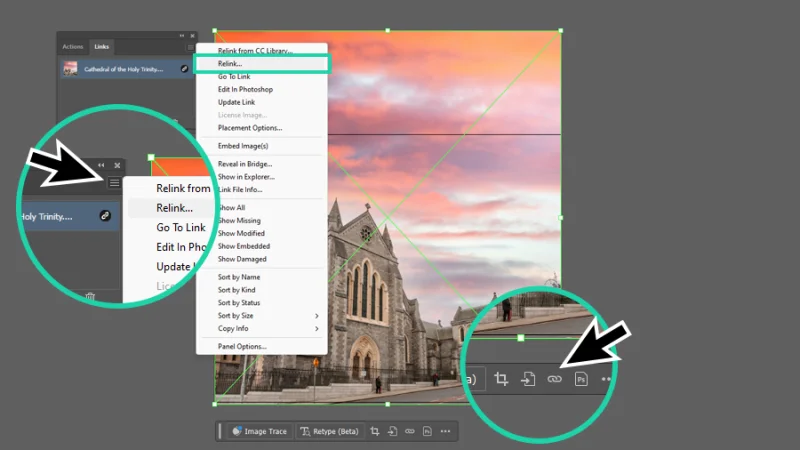
Relink like a Pro!
Select the PSD file in the browser window that pops up, hit Enter or click the Place button, and it’s updated! Yes! You can confirm that you have seamlessly linked the PSD file to the Illustrator artboard and the background is gone! Awesome!
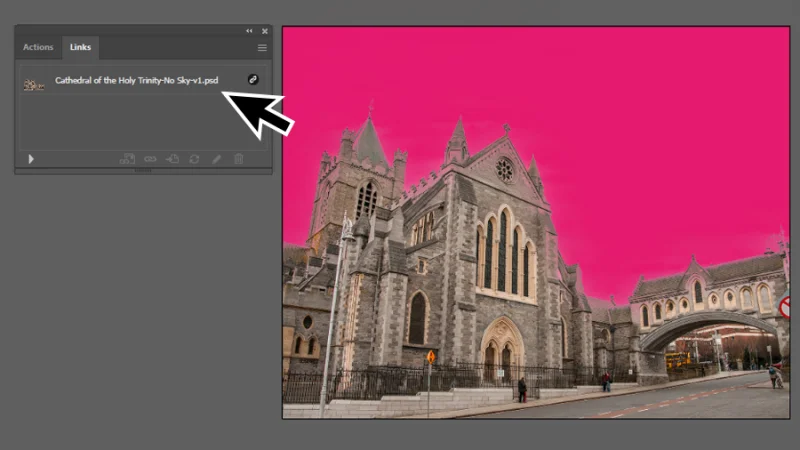
And the sky is gone! I wonder what comes next. Can you guess? I’m sure you can!
You know this is a pixel-based image, right? You also know by now that Illustrator loves vectors! Pixels, not so much! That’s Photoshop territory. We can convert the image into a vector shape, using Image Trace. You can activate it from the Contextual Task Bar or on Quick Actions in the Properties Panel.
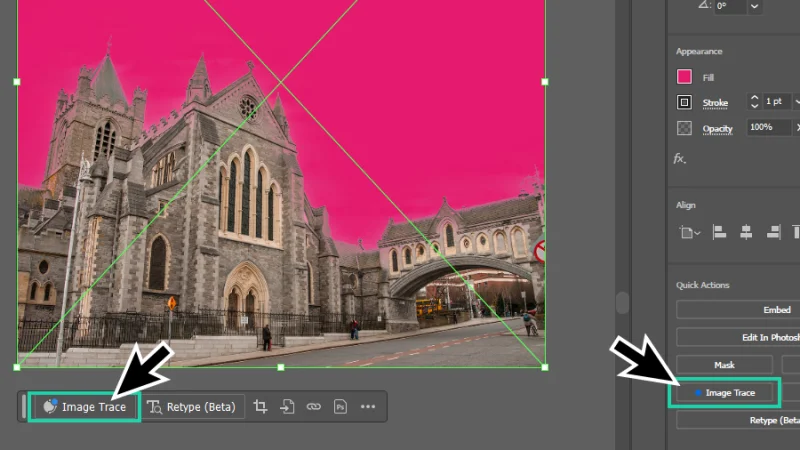
The Image Trace Tool
Once you click on Image Trace, Illustrator applies the default settings, a basic Black and White option. You can open the settings panel from Image Trace in the Properties Panel, clicking the Image Trace button on the top Control bar, or going to Window and selecting Image Trace.
We need to convert the image to a grayscale. Why? Because grayscale removes all color from the image, leaving only shades of gray. This gives us a neutral foundation for the duotone colors to interact and get that vivid look.
Inside the Image Trace panel, click on Mode and pick Grayscale from the drop-down menu. You can fine tune the settings, by adjusting options like Grays (number of gray tones applied to the vector image), the number of Paths and Corners (to set smoother or sharper shapes), and others.
The transparency will turn white once you complete tracing the image, but don’t worry! Two clicks and it goes away again. Look for Method and pick the first option, Abutting, for cutout paths. Next, move the mouse to Options and check Ignore Color.
Illustrator will update the trace process, it may take a few seconds depending on your computer’s available resources, and the white sky will be gone again.
Another way to do it would be Expanding the whole shape after the trace is complete, select the white sky, and delete it. But we did it the Pro way and that’s brilliant!
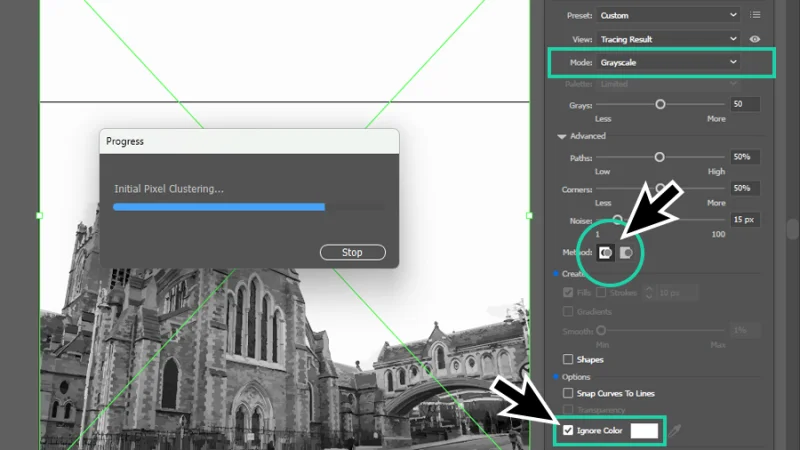
Image Trace converts raster images into vector shapes, Illustrator’s favorites!
Let’s add color to the image. First, we select it and Expand its appearance by clicking on the Expand button under Quick Actions, in the Properties Panel. Just in case you don’t remember, Expand breaks the traced image into separate and editable shapes.
Once the image is expanded, Recolor should be available in the Quick Actions panel. Click on the button to open the Recolor Artwork panel. Next, click on Advanced Options to have a peek at some more Pro stuff!
There’s a whole world of settings to explore in these Advanced Options. For this post’s purpose we will keep it short and simple.
Under Color, pick 1. Next, we click on the color picker square next to the HSB (Hue, Saturation, Brightness) sliders to pick a color hue. Choose a hue that complements the pink-ish background and click OK. We can play around with HSB values to fine tune the selection. Don’t worry about being too specific, we may need to come back and make some adjustments. Click OK in the Recolor Artwork panel to apply the recolor settings.
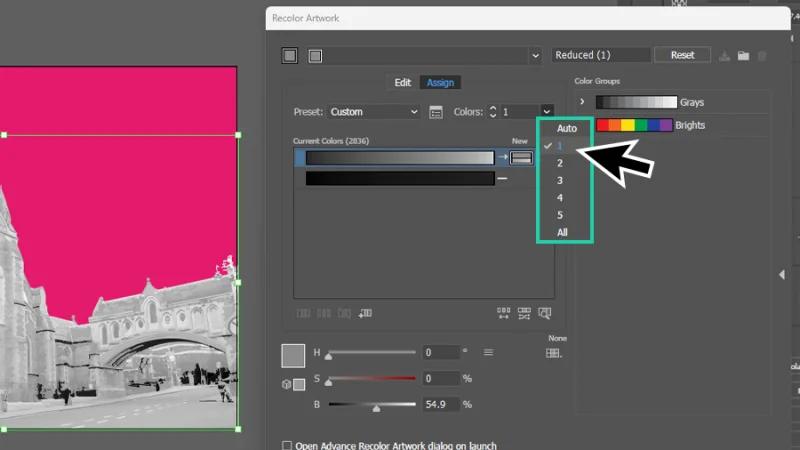
We use Recolor artwork to pick our duotone’s first color.
Time to apply some blending modes and… blend the image with the background color, the second on our duotone effect. Under the Appearance panel, click on Opacity, and then on the dropdown on the top of the flyout window. Testing some of the blending modes, I found out that Darken works pretty well, but if you have different colors you may find a mode that works better.
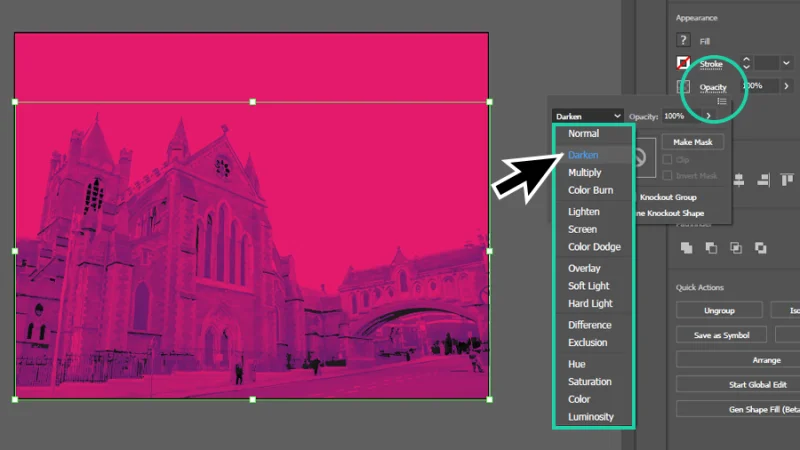
We are getting there! How awesome is this?
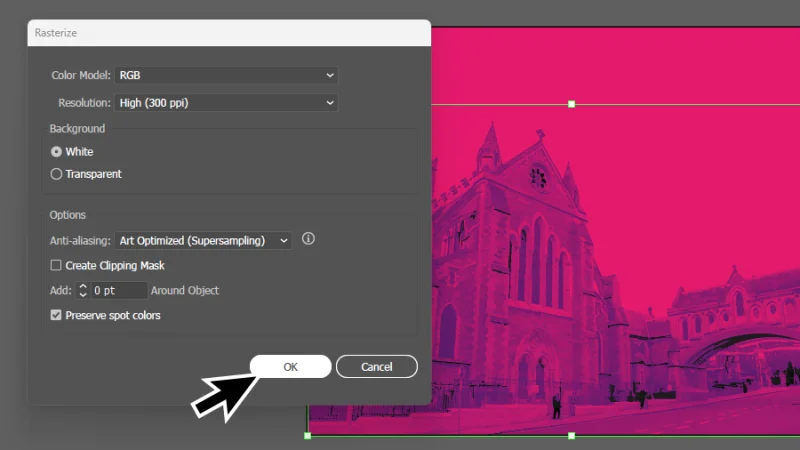
To give our poster a special look, and practice some more skills and features, let’s apply a color halftone effect to the image. To begin, let’s convert our vector shapes back to raster format, because special filters like halftone manipulate pixels.
Select the image, go to Object on the top menu bar, and click on Rasterize. Inside the Rasterize panel, we can spend some time exploring the available settings, but I’ll leave them as they are, to keep us focused on our poster finish line. As a quick example, if this poster should go to print, a 300ppi (pixels per inch) resolution would be the best choice. Click OK to finish.
Timeout #1
Expand your portfolio with some unforgettable duotone designs. Dive deep into duotones and get inspired by some of the examples shared in this article.
We go full circle now and move back to a pixel-based image.
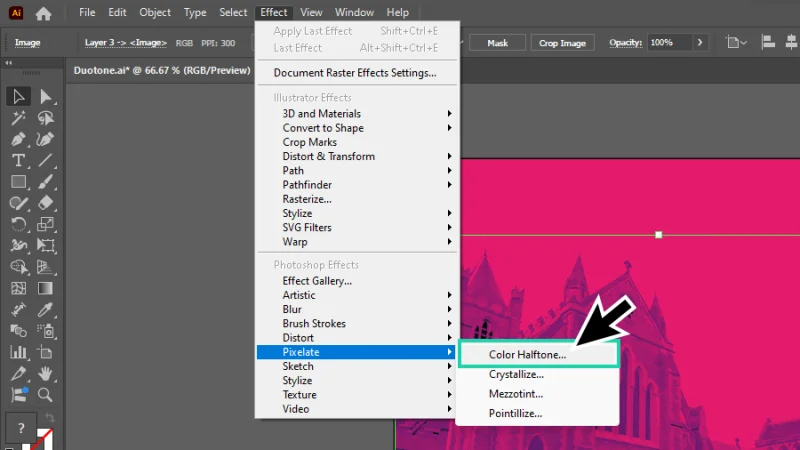
Let’s set our color halftone now. Basically, color halftones are often used in print and create a grid with dots that display a specific size and spacing to create the illusion of a continuous tone or gradient flow, when viewed from a distance.
Let’s move up to Effect on the top menu bar, hover down to Pixelate and then click on Color Halftone to open its settings panel.
Let’s add one final effect to our image and wrap up our poster.
Let’s set our dots’ Max. Radius to 4 pixels and click OK to finish. Since we are applying an effect to our image, we can always come back to the Color Halftone panel by clicking on the Color Halftone effect link in the Appearance panel.
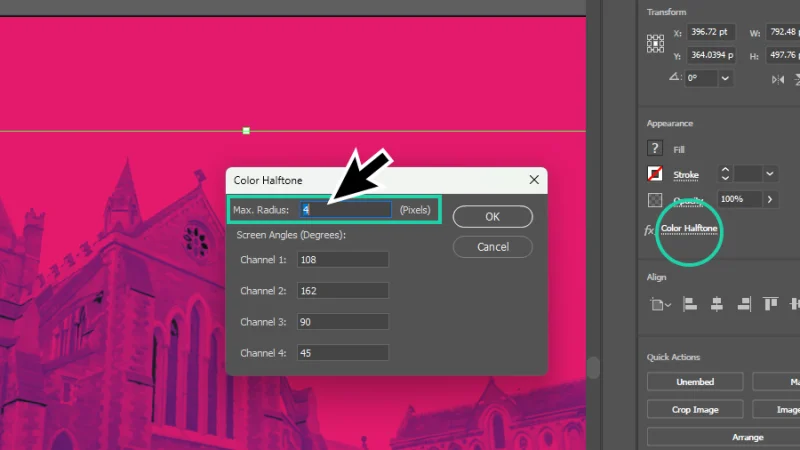
Radius values adjust dot visibility. Low values allow for a more subtle effect, with higher detail.
To have a better understanding of how Color Halftone works, let’s zoom in a bit on the image we’ve just edited with that filter.
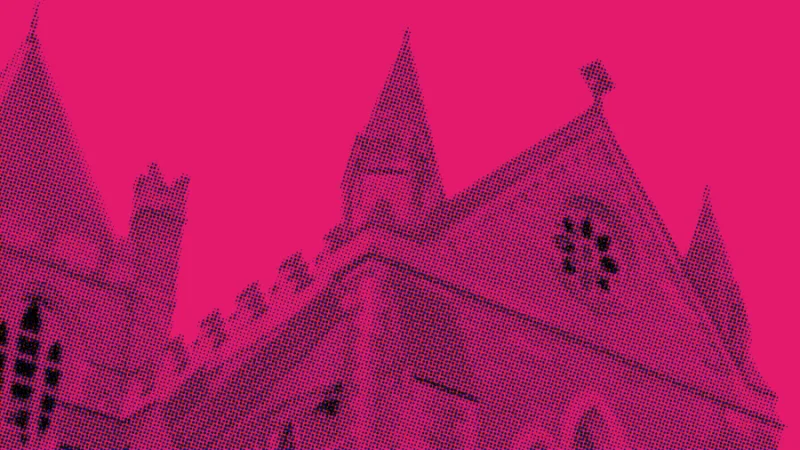
If you move closer to the screen, you’ll clearly see the dots. If you step away, the image will look clearer.
Wrapping up, let’s bring back our text elements and try to find the best layout to balance image and words, making sure our users will benefit from a beautiful illustration and have good readability.
Timeout #2
Having a blast with duotones and this bonus halftone effect? Expand your knowledge a bit more by exploring these awesome dotty images and add this skill to your designer toolbox!

Awesome! Remember the ‘Before’ image at the start?
And There We Have It!
Wow, we’re done! I was having so much fun with all these skills that I almost didn’t realize we had reached the end of this post. I hope you’ve enjoyed this quick tutorial and find the inspiration to dive deeper and create some stunning new designs, using Image Trace, Duotones, Halftones, and so many other amazing tools that Illustrator has for you as an accomplished illustrator and vector designer!
What 's Next?
To go deeper with Illustrator, join BYOL and you will gain access to my Illustrator Advanced course as well as my 30+ additional courses on Photoshop, Lightroom, InDesign, Figma, and more. As a BYOL member you will also enjoy personalized support, earn certificates, and tackle exciting community challenges. Head here to sign-up!
See you in class! – Dan
Popular posts
Adobe MAX 2025 - File Download
Daniel Scott
Modeling Shortcuts in Blender
Daniel Scott
Plugins in Illustrator
Daniel Scott
How to Straighten the Horizon in Photoshop
Daniel Scott
Go from zero to design hero with our awesome courses!


- Powered by Marvin
- Terms of use
- Privacy policy
- Cookie policy
-
- © Bring your Own Laptop Ltd 2026