How to make images Black & white in Illustrator & mix with color
Questions


Student Gallery
Be the first to share something.
Course info
Overview
Course duration 8 hours + your study.
Get the completed files here

Daniel Scott
Founder of Bring Your Own Laptop & Chief Instructor
instructorI discovered the world of design as an art student when I stumbled upon a lab full of green & blue iMac G3’s. My initial curiosity around using the computer to create ‘art’ developed into a full-blown passion, eventually leading me to become a digital designer and founder of Bring Your Own Laptop.
Sharing and teaching are a huge part of who I am. As a certified Adobe instructor, I've had the honor of winning multiple Adobe teaching awards at their annual MAX conference. I see Bring Your Own Laptop as the supportive community I wished for when I was first starting out and intimidated by design. Through teaching, I hope to bring others along for the ride and empower my students to bring their stories, labors of love, and art into the world.
True to my Kiwi roots, I've lived in many places, and currently, I reside in Ireland with my wife and kids.
Certificates
We’re awarding certificates for this course!
Check out the How to earn your certificate video for instructions on how to earn yours and click the available certificate levels below for more information.
Downloads & Exercise files
Transcript
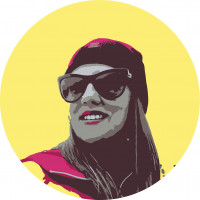
Hi there, in this video we're going to do two things. We're going to take this colored image, and turn it into a black and white image. Then we're going to do some cool stuff with colors, and blending with the background. You can see a few different options there. Let's go do that now in Adobe Illustrator.
To get started you can open up a file, in our 'Exercise files', called 'blending modes - black and white.ai'. I've just put in some basic stuff to get us going. Phase one, is bringing in an image, and making it black and white. So we're going to go 'File', 'Place', and we're going to find an image in here called 'grayscale.jpg'. Click 'Place'. I'm going to drag it so it kind of fits in the background here. It's a little bit too big, we should trim that up. I'm not going to bother. I also want to send it to the back. So 'Command Shift', and square bracket, '[', or 'Control Shift', square bracket on a PC.
Now we need to make it black and white. So black and white in Illustrator is, with it selected with my 'Black Arrow', I go up to 'Edit' and I go down to 'Edit Colors', and I've got 'Convert to Grayscale', and it's black and white. Now that's fine, and this one looks fine. I find that Illustrator does-- it's got one option, right? It's pretty kind of, just take it or leave it. So what I tend to do is, I'll do the same image in something like Photoshop. I know it's not a Photoshop class but even if you've never used it do this particular thing. All you want to do is, with it open, go to 'Adjustments', there's an option in here. This little icon here is the 'Black and White'. It does a similar sort of thing, we'll have a little look. It's slightly different.
Where it gets different in Photoshop though is, you get to adjust the colors. So in here you get to say what you do with the reds. So you get a bit of control. You can see, rather than just leave what the default is you can say, actually I want to do some other stuff with him, maybe darken him up. Just gives you a lot more control about how this thing gets converted to black and white, which I love. There's no green in the image, but these guys do. A little bit cyan in his pocket, turns out. Little bit blue in his shirt. So you get to kind of have a bit more control.
Another cool thing about this in Photoshop is this guy here. It's got a terrible name, the On Art Modifier. But give it a click. What it does is, means that you get to click and drag. So I've turned it on. You know it's active because it's dark. And over here I get to say… say his cheeks need a bit of work, I can click, hold, and drag left and right. So instead of just trying to guess over here what colors are affecting things, you need to go, and say, this bit of the checkered shirt, a bit brighter, darker. So it's just really kind of teched our pocket. I need to kind of darken down because here it's quite bright, I need to darken it down. The fence here, bring it up, down. So you just click, hold, and drag.
The other thing, you might not want black and white, you might want a tint, there's a tint option here. By default it's got kind of sepia tone. So that is the Black & White Tool in Photoshop. Now you can save that out. Maybe as a PSD, maybe as a JPEG, and bring it into Illustrator. I'm not going to, but if you want to do more with Photoshop tips and tricks like these, I've got a Photoshop course. So check out either the Essentials of the Advanced one of that. All right, back into Illustrator.
What we want to do now is get-- there's kind of coloration interacting with the background like we saw at the beginning. It's quite easy, it's called Color Blending, like we did in an earlier tutorial. So 'Black Arrow, I've got this red box selected. Go to opacity, click on the word 'Opacity'. 'Normal', and then just play around here until you find one that works. I like Multiply, looks pretty good. They've all got different kind of effects. Also know that if you use a different color-- I use kind of a rich red, that's going to work this way with Multiply, but if you have a different color you'll find that some of these options can be quite different. I'm going to leave that at Multiply, because I like it, and move on to our next one.
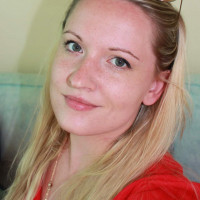
What we're going to do in the next bit, we're going to grab our 'Artboard Tool', just make a duplicate. So 'Artboard Tool', I hold down the 'Option' key on a Mac, 'Alt' key on a PC to get a second version. In this one what I want to do is not only colorize this, actually I'm going to touch this bit to black. I want you to be black. Doesn't really matter with Multiply. It could be a normal Multiply only. They both look the same. What I'd like to do is add these kind of guys up here, grab these three. I'm going to just make them nice and big. Just stretching them out, I'm going to rotate them. What I really want to do is the layer order is kind of important; not kind of important, it's very important. So I'm going to get him there. What I can't do is overlap this other document. So I might have to move this guy across with my Artboard Tool. So there's a bit more space.
So with these selected, I'm going to send them to the back and bring them forward, so they are just one-- just in front of the gray, but not in front of this text, because I don't want this color affecting that. Now exactly same thing, I'm going to go through, 'Stroke'-- sorry, the word is 'Opacity', and pick another one of these. You can do some really cool stuff with different colors. What is this color mode? It's quite cool. Looks like too much. Just one of the boxes. And this one here is 'Multiply'. Looks pretty cool. 'Color Burn', 'Lighten'. Kind of color burnt. Cool kind of Instagram look. And what we might do as well is draw a rectangle to crop these guys in. So I'm going to intersect you, intersect you. I'm going to select all these boxes plus that image in the background. Can't grab him, hard to grab. Come on, Daniel. Professional. Grab them all, cut them all. So I've got everything selected, this image, these boxes, this guy here. Because this guy's in the front I can hit 'Command 7', or 'Control 7' on a PC. Just kind of crop them all in. They're still there. I'm going to select on this, and move it to the back so I can see my text.
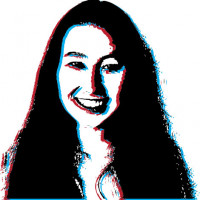
One last thing I'll show you. You saw at the beginning there, I'm going to grab my Artboard Tool, 'Shift O', and I'm going to hold down the 'Alt' key, or 'Option' key. I'm going to right click, 'Release Clipping Mask'. Don't want you guys anymore. Thank you, very much. We're going to do two things, one is, I'm going to kind of posterize him. It's called Half Tone, kind of that cool-- I don't know, exaggeration of old school printing. Not old school, actual printing, but I'm going to blow it up to look quite cool, so we're going to select him. We're going to go into 'Effect'. Dan's going to try and remember which one this is in. Guess it's Pixelate, Color Halftone, that's what I'm after. I'm going to just leave all the defaults. And that's going to be our result.
What we might do as well just to kind of give it a little, I don't know, what's that? Dan's Netflix show. It's Making a Murderer. I love that series anyway. That's what we're going for anyway, we're going for red. Then we're going to go and play with the opacity. Actually we're playing with the Blending Mode inside of Opacity. And in here we're going to pick one of these, right? Kind of some color burn, I like it. It's got that kind of look to it. Maybe I'm making it up but you get the idea, right? You can play around with obviously Color Halftone, you can drag that off, click on this guy, and update it in here and decide, kind of Max Radius, Channels 1, 2, and 3. Just kind of edit it. This looks quite different when you're working with a colored image because we only have one channel being used. So play around with the colored image, mine look quite cool as well.
All right my friends, that is how to work with black and white images, and do some cool stuff with Color Blending Modes. All right, I'll see you in the next video.
- Powered by Marvin
- Terms of use
- Privacy policy
- Cookie policy
-
- © Bring your Own Laptop Ltd 2026